
Welcome to the Singer Sewing Machine Instruction Manual, your comprehensive guide to mastering sewing techniques, troubleshooting, and maintaining your machine for optimal performance and creativity․
1․1 Overview of the Manual’s Purpose and Structure
This manual provides a detailed guide for Singer sewing machine users, covering setup, operation, and maintenance․ It includes step-by-step instructions, safety tips, and troubleshooting solutions․ Organized into logical sections, the manual ensures easy navigation, helping users maximize their sewing experience․ Whether you’re a novice or experienced sewer, this resource offers comprehensive support for optimal machine performance and creative projects․
1․2 Brief History of Singer Sewing Machines
Singer Sewing Machines, established in 1851 by Isaac M․ Singer and Edward C․ Clark, revolutionized sewing with innovative designs like the vibrating shuttle and the first electric model․ Their legacy continues with durable, user-friendly machines, maintaining a reputation for quality and creativity in the sewing industry for over 170 years․

Safety Precautions and Basic Operation
Read all instructions before use․ Follow essential safety guidelines, such as avoiding loose clothing and ensuring a clear workspace․ Use only Singer-recommended parts for optimal safety and performance․
2․1 Essential Safety Guidelines for Using the Sewing Machine
- Always read the manual before first use to understand proper operation․
- Avoid wearing loose clothing or jewelry that could get caught․
- Keep children and pets away while sewing․
- Use the correct power source and avoid overheating․
- Never leave the machine unattended while in operation․
- Follow maintenance instructions to ensure safe functionality․
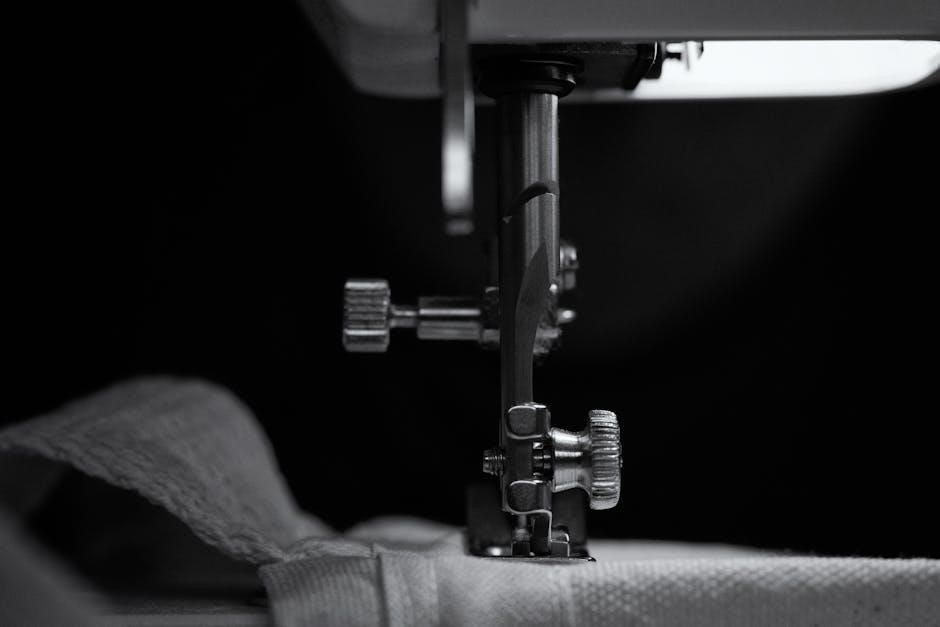
2․2 Understanding the Machine’s Parts and Components
Familiarize yourself with the Singer sewing machine’s key components, such as the spool pins, bobbin area, tension dials, presser foot, and power switch․ Each part plays a crucial role in ensuring smooth operation․ The spool pin holds the thread, while the bobbin area affects stitch consistency․ Properly understanding these elements will enhance your sewing experience and help you troubleshoot common issues effectively․
Setting Up Your Singer Sewing Machine
Unpack and inspect your machine, ensuring all accessories are included․ Plug in the power cord, turn it on, and familiarize yourself with its features for a smooth start․
3․1 Unpacking and Initial Inspection
Begin by carefully unpacking your Singer sewing machine, ensuring all accessories are included․ Inspect the machine for any visible damage or defects․ Cross-reference the contents with the provided list to confirm everything is accounted for․ Power on the machine to test basic functions and ensure it operates smoothly․ This step ensures a trouble-free setup and sewing experience․
3․2 Plugging In and Powering On the Machine
Locate a nearby power outlet and insert the machine’s power cord, ensuring it is securely connected․ Double-check that the outlet matches the machine’s voltage requirements․ Place the machine on a stable, flat surface․ Press the power button to turn it on․ The machine will hum softly, indicating it is ready for use․ Ensure all lights and controls function properly before proceeding․

Threading and Bobbin Insertion
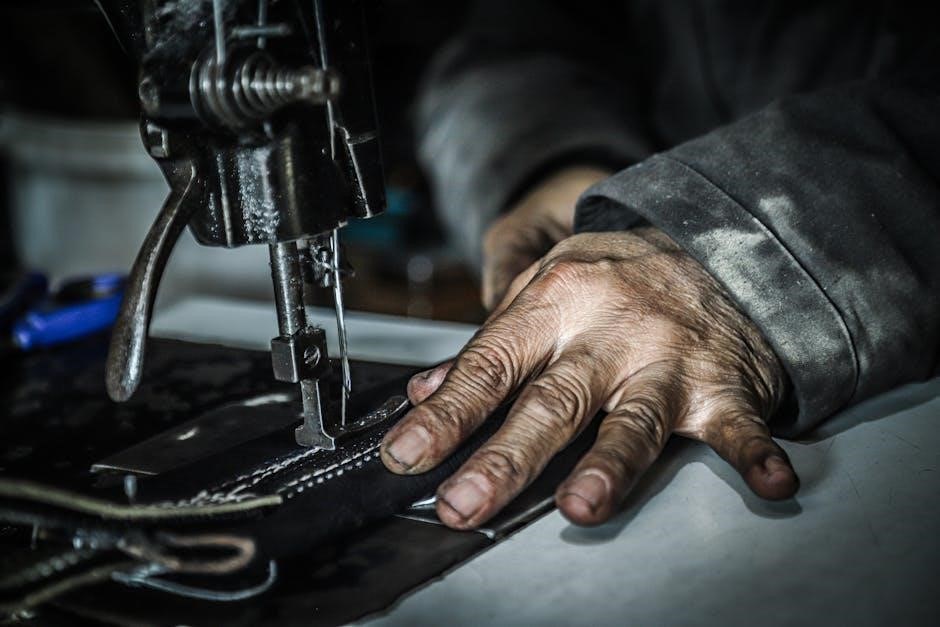
Properly thread the machine by guiding the thread through the tension discs and take-up lever․ Ensure the bobbin is correctly inserted and seated securely in its compartment․
4․1 Step-by-Step Guide to Threading the Machine
Start by turning the handwheel to raise the take-up lever․ Insert the thread through the tension discs, ensuring it clicks into place․ Guide the thread through the take-up lever and needle bar․ Leave a small loop at the needle eye and gently pull the thread to seat it properly․ Repeat for the bobbin thread if necessary․
4․2 Proper Bobbin Insertion Techniques
Open the bobbin case and insert the bobbin, ensuring the thread unwinds counterclockwise․ Gently pull the thread to seat the bobbin correctly․ Close the case and test by sewing a few stitches to ensure smooth operation․ Proper insertion ensures consistent stitching and prevents thread jams or machine damage․

Selecting the Right Stitch for Your Project
Choose the perfect stitch for your sewing task, from basic straight and zigzag stitches to decorative and stretch options․ The manual guides you in selecting stitches for seaming, finishing, or embellishing fabrics, ensuring optimal results for every project․
5․1 Overview of Stitch Types and Their Uses
The Singer sewing machine offers various stitch types, including straight, zigzag, and decorative options․ Each stitch serves a specific purpose, such as seaming fabrics, finishing edges, or adding embellishments․ Understanding the function of each stitch type ensures you select the right one for your project, enhancing both durability and creativity in your sewing work․
5․2 Adjusting Stitch Length and Width
Adjusting the stitch length and width on your Singer machine allows for precise control over your sewing․ The stitch length determines the distance between stitches, while the width affects the zigzag’s span․ Refer to your manual for specific dial or button controls, ensuring optimal settings for different fabrics and projects to achieve professional-looking results every time․
Maintenance and Troubleshooting
Regular cleaning and lubrication ensure smooth operation․ Refer to the manual for troubleshooting common issues like thread jams or uneven stitches, ensuring optimal performance and longevity․
6․1 Routine Cleaning and Lubrication
Regular cleaning and lubrication are essential to maintain your Singer sewing machine’s performance․ Use a lint brush to remove dust and debris from the bobbin area and feed dogs․ Apply a few drops of sewing machine oil to moving parts, following the manual’s guidelines․ Clean the machine after each use to prevent fabric residue buildup and ensure smooth operation․ Always unplug the machine before servicing․
6․2 Common Issues and Their Solutions
Identify and resolve common Singer sewing machine issues quickly․ If the machine jams, check for tangled threads or incorrect bobbin insertion․ For uneven stitches, adjust the tension or ensure the needle is properly threaded․ Lubricate moving parts if the machine is noisy․ Refer to the troubleshooting section for detailed solutions to keep your machine running smoothly and efficiently․

Accessories and Attachments
Explore Singer’s wide range of accessories and attachments designed to enhance your sewing experience․ From presser feet to specialized tools, these additions help you achieve professional results effortlessly․
7․1 Compatible Presser Feet and Their Functions
Singer offers a variety of presser feet tailored for specific tasks․ The All-Purpose Foot is ideal for straight stitching, while the Zipper Foot handles zippers and thick fabrics․ The Blind Hem Foot is perfect for invisible hems, and the Buttonhole Foot automates buttonhole creation․ Each foot enhances sewing precision and versatility, catering to different projects and fabric types with ease․
7․2 Using Optional Accessories for Specialized Sewing
Optional accessories like embroidery hoops, quilting guides, and specialized presser feet expand your sewing capabilities․ The walking foot is ideal for thick fabrics, while the extension table provides extra workspace for large projects․ These tools enhance precision and versatility, allowing you to tackle intricate designs, heavy-duty sewing, and creative embroidery with ease and professional results․

Upgrading and Updating Your Machine
Keep your Singer sewing machine up-to-date with software updates and new features․ Visit the official Singer website to download the latest updates and installation instructions for enhanced functionality and performance․
8․1 Software Updates for Computerized Models
Regular software updates ensure your Singer computerized sewing machine operates at its best․ Visit the official Singer website to download the latest updates, which may include new stitch patterns, enhanced features, and performance improvements․ Follow the provided installation instructions carefully to maintain compatibility and optimize your sewing experience with the newest technologies available․
8․2 Installing New Features or Upgrades
To enhance your sewing experience, Singer offers optional upgrades and accessories․ Install new presser feet, embroidery units, or advanced stitching kits by following the manual’s specific instructions․ Use only Singer-approved parts to ensure compatibility and maintain warranty coverage․ Contact Singer’s customer support for assistance with complex installations or troubleshooting during the upgrade process․
- Follow step-by-step installation guides․
- Use genuine Singer accessories․
- Refer to the manual for compatibility․

Downloading or Obtaining the Instruction Manual
Access Singer sewing machine manuals on the Singer website․ Download free PDFs for various models, ensuring you have the correct guide for your specific machine model․
9․1 Free PDF Downloads from Official Sources
Download Singer sewing machine manuals for free from official sources․ Models like 6SS, 7-33, and 12W are available in PDF format, ensuring easy access to guidance for your specific machine․
Visit Singer’s official website or authorized support pages to find and download manuals instantly, supporting Singer’s Green Initiative to reduce environmental impact․
9;2 Finding Manuals for Specific Singer Models
To find manuals for specific Singer models, visit Singer’s official website or authorized directories․ Use the search bar to input your model number, like 15k or 66k, and filter results․ Popular models such as the Singer 4452 Heavy Duty and 9960 Quantum Stylist are easily accessible․ Ensure compatibility by verifying the model number before downloading․
Singer’s Customer Support and Resources
Singer offers dedicated customer support through their official website, online communities, and forums․ Users can access resources, troubleshooting guides, and connect with experts for assistance and advice․
10․1 Contacting Singer’s Customer Service
To contact Singer’s customer service, visit their official website and navigate to the “Contact Us” section․ Fill out the provided form with your inquiries or concerns․ Additionally, Singer offers support via email and phone for immediate assistance․ Their team is dedicated to addressing questions about sewing machines, troubleshooting, and maintenance, ensuring a seamless experience for all users․
10․2 Online Communities and Forums for Singer Users
Join Singer’s online communities and forums to connect with fellow sewists, share projects, and gain expert advice․ These platforms offer troubleshooting tips, creative ideas, and support for various Singer models․ Visit Singer’s official website or popular sewing forums to engage with enthusiasts and professionals, ensuring you maximize your sewing experience with Singer machines․

Environmental and Warranty Information
Singer supports eco-friendly practices by offering digital manuals, reducing paper waste․ Warranty details cover parts for 5 years, excluding needles, bobbins, and belts, ensuring durability and reliability․
11․1 Singer’s Green Initiative and Digital Manuals
Singer has embraced a Green Initiative to minimize environmental impact by transitioning to digital manuals․ This shift reduces paper usage, aligning with global sustainability efforts․ Users can access comprehensive guides online, ensuring convenience while promoting eco-friendly practices․ The company remains committed to providing detailed instructions and resources in an easily accessible digital format for its customers worldwide․
11․2 Warranty Details and Exclusions
Singer offers a 5-Year Limited Warranty covering defects in materials and workmanship for most parts under normal use․ Exclusions include needles, bobbins, belts, light bulbs, and shuttle hooks․ Proper registration and maintenance are required to uphold warranty validity․ Detailed terms and conditions are outlined in the manual to ensure optimal coverage and protection for your sewing machine․
Maximize your sewing experience with Singer by exploring creative projects, maintaining your machine, and utilizing available resources for troubleshooting and inspiration to enhance your sewing journey․
12․1 Maximizing Your Sewing Experience with Singer
Enhance your sewing journey with Singer by exploring diverse stitch options, utilizing compatible accessories, and maintaining your machine regularly․ Stay inspired by accessing online tutorials, community forums, and creative projects․ Singer’s resources empower you to unlock your full potential, ensuring every sewing project is a success and fostering a lifelong passion for creativity and craftsmanship․
12․2 Encouragement to Explore Creative Sewing Projects
Unleash your creativity with Singer by exploring a variety of sewing projects, from DIY home decor to unique garments․ Discover inspiration through Singer’s online tutorials and community forums․ Whether you’re crafting seasonal decorations or personalizing gifts, Singer’s resources will guide you to create something truly special, fostering a sense of accomplishment and joy in every stitch․